Sunday, August 28, 2011

Tom's Ukulele.

So I've been up for 44 hours straight, I apologize if I stop making sense or go off on irrelevant tangents.  I got the last couple coats of finish on over the weekend.  Got a 6" polisher/buffer at harbor freight on saturday, but didn't get to that until today.  So here it is all finished. 


Specs:
  • Bookmatched Black Walnut front/back/sides
  • Brazilian Ebony fretboard and bridge
  • Camel bone nut and saddle
  • Black walnut two piece neck
  • Banjo style friction tuning pegs
  • Mother of pearl inlays
  • Ivoroid synthetic ivory bindings
  • Overall length 20"
  • 2 1/8" deep
  • 6 1/4" wide at lower bout
  • 40mm width at the nut, 55mm at the heel
  •  350mm scale length


I'm too tired to tune it up right now.  Gonna take a nap and do that in the morning.  Next up will be a special custom for my best customer, Lou Shields.

Friday, August 26, 2011

Tom's Ukulele, finishing

So this week has been all about finishing.  Instead of using shellac on this one, I was advised to go with wipe on polyurethane to get used to the method.  There isn't really much to fuck up, I don't have to mix it, and there's very little sanding involved.  I've got about 4 coats on right now, and will probably do one more before polishing it with some super fine grit compound to smooth out the uneven spots.  Right now it's hanging up on a little jig I made on the workbench drying.


It came out a little darker than I expected.  The Poly had a very slight blonde tint to it that I guess darkened up the wood a little.  It did kinda make the binding look like real ivory though, so thats pretty cool.  I'm hoping to have this done by Sunday.

Tuesday, August 23, 2011

Tom's Ukulele, Almost there

So I think when I left off, I had the neck clamped and glued.  I ended up attaching the bridge the same night.  Tonight I did all the touchups with home made wood putty, some sanding, and stained the back/sides/neck.  I only have one pic right now, I'm in the proccess of shellacing it and can't flip it over until it's dry.

Saturday, August 20, 2011

Tom's Ukulele update

So on Monday I injured my ribs while skating, and had to put off working for a few days.  I was feeling good enough to work today, and hadn't showered, so I figured this would be a good opportunity.

I was working fast and steady, so I don't have as many pics this time around.  I cut out the headstock and finished shaping the area where the break angle occurs.  I also drilled the tonuer holes, and added the decal.


After that I worked on cleaning up a couple spots where I had some saw marks by making a filler from sawdust and woodglue.  While that was setting, I did the same with the body and sanded the whole thing smooth. 

Once the neck putty was dry, I sanded that all off and drilled the dowels I'm using instead of a dovetail.  I'm pretty pleased with how that turned out, although my brad point drill bit went a little deep and I had to go back over it with the putty. 


I had to wait a bit for my drill to charge, but I painted up the dowels, back of fretboard, and underside of the heel with titebond and clamped it up.  Should be solid as a rock in an hour or two.


Tomorrow the bridge goes on.

Monday, August 15, 2011

National NPR Single Cone Resonator

So I've been waiting about a week for my dremel base to arrive, only to find out my mom never put in the order.  Looks like the Uke is on hold a couple days.

In the meantime, Lou recently bought a National NPR single cone resonator to compliment his tricone.  He's been playing a lot of open mics and jams lately, and one of them is electric only and his soundhole pickup just wasn't cutting it.  He bought the best powered piezo pickup on the market for his new National, and asked me to install it.

I only took a few pics, there's not all that much to it.  Just several tedious steps (such as drilling through steel to mount the input jack). 

Here's the mounted preamp:


This would have been much easier if I had a smaller drill/power screwdriver.  I'll have to look into getting one that isn't 15 pounds.  It was also kinda tricky wiring the rca jack, there wasn't a ton of wire to work with. 

New biscuit bridge with piezo:


The biscuit was supplied with the kit, as the pickup is mounted in a routed channel underneath.  Once I got the slots cut, I stuck the cone back in, and strung her back up.  Plugged it into my Hiwatt, and thankfully it works first try. 


I would've recorded a sample to post with this blog, but the neck is gigantic by my standards and I can't get used to the wider string spread.  So I saved myself the embarrassment, and you readers the potential deafness and skipped it.  Also, note the Lou Shields Live album in the background.  You can order copies from him at atomicpossumrecords.com

Sunday, August 14, 2011

Tom's Ukulele, Body Bindings

So I finally made it to Chicago today to pick up my box from Specimen.  My sister wanted to go to the high school All-American baseball game, so I took that opportunity to go get my stuff. 

When we got home, I got everything set up in the garage, made my little jig up to hold the body in place, and routed the channels for the binding.


I had all my tape laid out and ready to go, so I got out the heatgun and went to work.  I forgot how much of a pain this part is.  You really have to work fast.  My thumbs are also a bit raw from it, but oh well.  I got the top strip molded and glued in, and I let it sit for about an hour before taking the tape off.


After I was confident that it had fully set, I went to work on the back.  I accidentally spilled a little glue on the back, but that will sand out when I level it all out tomorrow.  There were also a couple bubbles from where I didn't work fast enough, but those will also be taken care of before I seal the whole thing.


I had used a clamp on the back to make sure the ends stayed together.  I had to go back and touch up the top after it popped out of the tape, so I made sure this time it would stay.  After that set for awhile, and I did as many touchups as I could with clamps, I took it all off, and here's where I'm at now:


I'll sand off the glue spots, and touch up where needed in the morning.  I'll also try to complete all the sanding/levelling/flushing and get some pics up of that sometime before monday.

Wednesday, August 10, 2011

Tom's Ukulele, Neck shaping

After stuffing myself full of a Pop's beef sammich, I went back out into the garage and shaped the neck.  I alternated between cabinet makers rasps, and a round and half round file.  After sanding and hitting it with some 0000 steel wool, I'm happy with the shape, but see a few spots that need additional sanding.  Some of that I'll have to wait until after cutting the headstock to do.  As soon as the tuners arrive in the mail, I'll take care of all that.  Aside from that, its all ready to join up as soon as I can get to the city to pick up my bindings that are sitting in the back room at Specimen.

For now, here's some pics.


Tom's Ukulele, Fretting

So I guess I forgot to take a couple pics, but I guess I don't want EVERY step being shown.  Anyways, last I left off, I had bound the fingerboard and inlayed it.  Once I had sanded the binding down flush and polished up the fretboard, I went ahead and glued it onto the neck.  After letting that set overnight, I trimmed down the neck a little bit and hammered and glued in all the frets.


It took some work to get a couple of the frets in, one of my strips/rolls of fretwire had a super tight radius, so the last few frets kept popping out. I ended up using a thicker viscosity (sp?) superglue on those and clamped them in overnight.

This morning I did all the levelling/bevelling/crowning on them.  I ended up having to use a traditional 3 sided file for some of the troublesome frets to get them to fit into my crowning file.  After that, I gave the whole fretboard a polishing, and set up a jig for my handheld belt sander to make it work as a stationary sander and sanded the rest of the neck flush with the fretboard.  Now its ready for shaping, which I'll tackle after lunch.


Tuesday, August 9, 2011

Tom's Ukulele, Neck part 2

So the next day I tackled the first half of the fretboard.  I did all the math for the fret scale, got out the digital calipers and fret saw, and cut all the slots.  Let me tell you, I'll never do this for a guitar.  Too much sawing, and hard to stay precise.  So after I got all my slots cut, I layed out my outline.


I may scoot the nut forward a couple millimeters, I want to make sure it gets placed on a flat surface, and it'll give me the option of joining at the 11th as opposed to the 12th fret. 

I cut the outline out by hand today.  I seem to have forgotten to take a pic of that.  It was pretty ugly, and took a few hours of sanding and filing to bring the overhang down to my pencil lines.  After I was satisfied with the edges, I marked the spots for the inlay dots, and drilled the holes.


I had to take a break after this to run to walmart to get some craft sticks to mix epoxy with.  As soon as I got back, I gathered up all the sawdust I could find from the sanding into a dixie cup, mixed in the epoxy, and clamped in my mother of pearl dots.  Here it is after some sanding to remove excess epoxy, and some scratches.


After this, I got out my heat gun, and a scrap of binding that was plenty long enough to wrap the whole fretboard, and molded it around the end.  I let it harden back up, then I glued it all in, where it now sits curing.  Tomorrow I plan on fretting it up and attaching to the neck.


I might go check on it in an hour or two.  If it's set, i'll add a pic.  Stay tuned.


Tom's Ukulele, Neck part 1

Sorry for the delayed update, been too busy working on this thing and been slacking on updates.  So the other night I glued up what I planned on using as the neck block and drew up the profile.

I had to draw it on this side, for the record, that isn't a crack.  I had originally glued a heel piece on, and decided to go another route, and cut it off.

I put the block through the bandsaw and cut it oversized to account for any sloppiness.  I only have 1 blade for it right now, and it doesn't like to make straight cuts. 


After cutting it out, I spent several hours sanding and filing it so that the headstock was flat and even thickness, and so that the heel area didn't show any saw marks.


I decided that was enough work for the night and saved the fretboard for the next day.  Those pics are coming up.

Friday, August 5, 2011

Tom's Ukulele, Trimming up the sides

When I woke up around 2, I took all the clamps off and popped the mold off.  Looks like both sides are secure, and I won't really need any touchups.


After dinner, I got out my laminate trimmer, and a flush/trim bit I bought from Stew Mac and practiced a few times trimming some 1/4" plywood scrap flush to my workbench.  After I was confident with my work, I went to town on the body.  My only real gripe about it is that it left a grease mark on the sides, but I have some finish sanding to do anyways, so it isn't a huge deal.  Other than that, I'm very pleased with the results.


I'm going to wait until after I do the bindings to get all the sanding taken care of.  I have to go pick the strips up from Specimen since I don't have enough in stock here.  Possibly going to do that tomorrow.

Tom's Ukulele, Back attachment

I let the glue sit about 4-5 hours with the clamps on.  Its supposed to take about an hour or two to harden, but like everything else, I like to be sure of things.  Plus its late and I got caught up in cartoons on tv.  I went out around 5 to take em all off and check the results.


I think it came out pretty damn good.  I'll note that the reason the whole thing looks crooked is due to 2 factors.  1)The braces are slightly offset, and 2)I cut the endblocks by hand, so they're bound to be a tad off.  There also appears to be a slight hump along the lower bout, but I seem to have accidentally made one in the exact same spot on the other side.  I think it adds some character, gives it a very slight violin look.

Anyway, I printed up a label to paste inside.  I was blanking on ideas for a logo, so I just made one similar to the Mosrite logo, and added in a model, serial number, and date lines.


I had trimmed up all the braces to fit after setting the clamps on the top, and gave the inside a 320/600 sanding, then hit it with some 0000 steel wool to erase my tool marks.

So fast forward a few hours, after I pasted the label in, I once again sanded everything level along the edges.  After that, I painted it up with glue, lined up the back, and clamped it on.  I used a few extra this time, the back has a slight curve to it, so I wanted to make sure I got full coverage.


I'll check on it tomorrow morning/afternoon and start trimming it all flush as soon as I remember where I put the bit I got from Stew Mac last week.

Thursday, August 4, 2011

Tom's Ukulele, Top joining

Yesterday I added some 1/4" side supports along a few curved areas to provide extra strength.  I also added some strips of veneer to each side of the neck/tail blocks.  The book I was reading recommended it to make the glue joint stronger, and also because I had hand cut the blocks and they were a little undersized.  I took a picture of it, but it was before I sanded a few things flush, so it just looked like garbage and I decided not to post it.

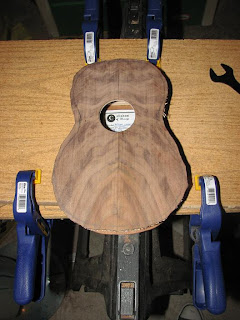
Tonight, I trimmed up the braces to fit inside the kerfing, and also sanded down all the uneven spots so it would be completely flush and fit correctly.  I then painted some glue around the edges, and on the end blocks, let it set for a few minutes to become tacky, and placed my top on to line up.  It came out pretty even, although I noticed that the sides are about 1/16" off center at the tail.  I had planned on inlaying a strip of lighter wood there anyways, so it won't make a difference.  Here's the pic of the top clamped on.


Yeah, I know thats a lot of clamps for a small instrument, but I prefer to play it save and not have loose spots.  Tomorrow I will attach the back, and if I have time, trim it all up with a flush router bit.

Tuesday, August 2, 2011

Tom's Ukulele, kerfing/linings

So I decided that since I was in such a good mood today, I'd get even MORE work done.  The neck and tailblocks went in just fine, with minimal amounts of glue to scrape.  I decided that since it was still early, Might as well get a little more done today. 

Stew Mac and LMII sell pre cut/shaped linings for a few bucks a piece, but me being the type of person I am, decided to hell with that nonsense.  Tom is a very close, longtime friend, and he wanted something truly original and hand made.  So I decided to go ahead and cut hundreds of notches by hand out of loyalty and nothing better to do. 


It took awhile, but I really take pride in my work, and try to do as much by hand as possible.  After cutting a 36" long 1/4" poplar dowel, I broke it into a few pieces and started gluing it in.  For those of you who like to poke fun at my excessive use of clamps...you're gonna love this...


Bought a 50 pack of clothespins at the dollar store after seeing someone use this method on a full sized acoustic build.  Not sure if this is the proper method, but it works great. 

I may or may not decide to do the other half tonight. Most likely I'll do it tomorrow.

Tom's Ukulele, End blocks

Well, I took all the clamps and spreaders off this afternoon, and was very pleased with the results.  I trimmed down the overhang on all four ends, and began making the neck and heel blocks.

I cut the blocks from more 2x12" scrap, and shaped them by hand with a pocket plane and some wood files.  Got them about as close as I could without going overboard, and I just glued them in.


I'm going to let these sit until later this evening at the earliest.  I prefer to give it extra time over risking not enough.  Once I'm confident with the glue joints, I will be cutting and gluing the kerfing to attach the top, and planing down the sides by about 1/16".

Monday, August 1, 2011

Tom's Ukulele, Sides

So I decided that I'd get to work on the sides tonight.  I set up my makeshift bending iron, got a tub of water, and my set of test strips.  It took about 4 tries before I got the hang of it and didn't leave any scorch marks.  Once I had the method to where I was comfortable, I got out the good set and had at it.  First one went rather smoothly, but on the second one I had a small crack occur.  I think its close enough to the end that it shouldn't matter.  Either way, it will sand out and be almost invisible by the time i'm done.  I accidentally melted part of my heat gun though.  I think I'll be more careful next time.  Heh...


I'm gonna let this set overnight and dry out/cool off.  Tomorrow after court I plan on trimming it to size and  installing a neck and tail block.